 Our goal this month to start assembling the components built so far for your medallion quilt. This is going to require thinking about your overall design again, laying out the blocks and border sections you’ve already built, and figuring out how to make them fit (which may require making more blocks for some borders).
As you are working this month, remember that there are still going to be two more border prompts, so your quilt will get bigger.
We have three topics this month: choosing a design framework for the medallion, tools to make the borders fit the desired spaces, and some helpful construction hints.
Start by revisiting some of the quilts that inspired your medallion. Do you like asymmetric designs? Lots of negative space? Wonky? Balanced? This may influence how you decide to construct it.
Design Frameworks:
Traditional: There is something very pleasing about a traditional medallion style with even borders that circle around the focal block. These can be constructed in many ways- lapped ends, mitered corners, using cornerstones. A given border will all be the same size in this style, but the borders can be different sizes from each other.


Log Cabin: Using a log cabin style construction provides lots of design opportunities. The borders can be uniform in size, or asymmetric. You can make all four sides the same, add border designs in pairs, or put different border designs on each side. I’ve tried to illustrate that using colors to indicate each border component in the diagrams below.
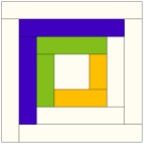


You can also start with your focal block in the corner of the quilt and build out asymmetrically from there.

Courthouse Steps: The courthouse steps variation on a log cabin block will also work well for medallion borders.
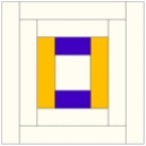
“Propeller” Style: I first saw this layout in a post advertising Sarah Bond’s “Making Modern Medallions” workshop, and I love the feel it gives a medallion quilt. It could be used for some, or all, of the borders.
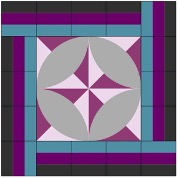
Diamond: Varying the orientation of your center and combining diamond and straight set borders is another interesting option.

Wonky: Start with your focal block off-kilter and build around it. The diagram shows just one of many ways to do this.

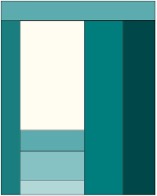
Columns: One of our members, Leslie Nellermoe, inspired this approach. She is starting with a batik panel as her focal block and building her rows in a mostly columnar fashion around it.
Tools to Make Your Border Components Fit:
Is your border too short? You can always make more blocks. Maybe it isn’t a whole block size short? In that case, consider adding spacer units between blocks or groups of blocks.


Is your border too long? It’s okay to cut some of it off. There is no rule that says every block has to be its full size. If you are just a bit too long, consider adding a narrow “coping strip” to increase the size of the inner blocks and borders enough to make the new border fit perfectly. Coping strips can also provide a design element, as in the test layout below:

For more ideas on ways to adjust borders to fit with the inclusion of novel design elements, see the books recommended at the start of this project, listed again at the end of this post.
Helpful Construction Hint:
To keep your quilt squared up as you add borders—measure across the center of the quilt, not the edge to which you are adding the border. When you stitch the border on, mark the center of the edge and the border piece, match the centers and the ends, and ease the fabric in if necessary. A good basic tutorial is here: How to measure and sew borders to a quilt.
June Summary
| Mild |
Medium |
Spicy |
| Traditional Borders |
Propeller styles |
Diamond Layout |
| Log Cabin Styles |
Piece more units to make borders long enough |
Wonky Layout |
| Courthouse Steps |
|
Piece more units to make borders long enough |
| Columnar |
|
|
| Use cornerstones/spacer blocks |
|
|
Don’t forget to tag your progress: #seamqgsalsaBOM
Resources:
Books:
Liberated Medallion Quilts, Gwen Marston, 2012
Medallion Quilts: The Art and Technique of Creating Medallion Quilts, Jinny Beyer, 1980
The Modern Medallion Workbook, Janice Zeller Ryan and Beth Vassalo, 2015
July Instructions
We will aim to post the next instructions right before the July meeting. Stay tuned, and happy sewing!