 For many quilters, the only thing scarier than foundation paper piecing is sewing curves! This month, we will explore ways to incorporate curves in your next border, hopefully without too much stress.
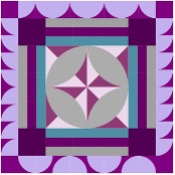
Drunkard’s Path blocks (quarter circles) are a classic patchwork block that works equally well in traditional and modern quilts. A Drunkard’s Path block generally uses paper patterns or specialty rulers or acrylic templates to cut precise shapes. A cool variation on the classic is to make an oval curve instead of a round circle. There are almost as many tips for stitching Drunkard’s Path curves as there are people teaching the technique. If you don’t like the first one you try, check out some of the other options before you give up entirely. Another tip: if this is your first time stitching this type of curve, aim for larger blocks, rather than smaller ones. Drunkard’s Path blocks that end up 3 inches finished are adorable but are much harder to sew the first time than a 6 inch block is.
Tutorial for classic (lots of pins) curve stitching: https://blog.wholecirclestudio.com/?p=3526
Fewer pins, still precise: https://suzyquilts.com/how-to-sew-curves-in-a-quilt/
No-pin tutorial: https://www.youtube.com/watch?v=0XzTJQ3wJGY&t=87s
If you don’t like any of these tutorials, you can google or check out YouTube until you find one that resonates with your sewing style.
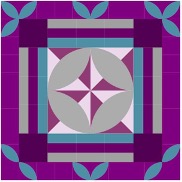
Once your blocks are made, there are lots of different ways to use them in a border. I’ve illustrated several options in the different borders in the diagrams below.

Wavy Bands: There are lots of different ways to achieve this look. You can create a pattern and piece it precisely (very spicy choice, just saying….), or you can cut and stitch long undulating freehand curves or make a long curve with bias tape.
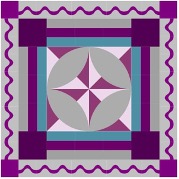

The diagram shows a very regular wave, but you will probably find it is easier to make a wave that is cut freehand and may be somewhat irregular.
Freehand/freestyle curves can give a beautiful energy to a border strip.

If you are lucky, you may have tried this technique in a class with Maria Shell or Katie Petersen. If you haven’t had that opportunity, here are some tutorials showing different approaches.
Gourmet Quilter- freeform curves tutorial: https://www.youtube.com/watch?v=9mIwp8TZtfU&t=82s
Jean Wells: Freehand curved piecing (no pins) https://www.allpeoplequilt.com/how-to-quilt/piecing/freehand-curved-piecing-piece-play
No pins freehand curves (blog, not video) https://www.redpepperquilts.com/2014/05/tutorial-cutting-and-sewing-free-hand-curves.html
Creating freezer paper patterns for freestyle curves. This method is finicky, but yields beautiful results and allows you to control what the shape will look like. https://www.paperpanache.com/machine-curved-piecing
If you aren’t excited about piecing a freestyle curve, you could consider making a wide bias tape from the fabric of your choice and appliquéing it in a sinuous wave onto your border.
Appliqué circles, ovals, or improv organic shapes onto border blocks.
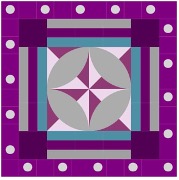
Another way to add curves is to create shapes (circles, ovals or curvy organic shapes) and applique them onto your border or blocks.
You can use turned edge applique, raw edge/fused applique or a simple reverse applique method (aka the “6 minute circle”)
Jo Avery: Freeform applique circles (“bubbles”) https://www.instagram.com/p/B-7bBXFHKC3/
6 minute circle: https://carolelylesshaw.com/6-minute-inset-circle-tutorial/
Organic 6 minute circles: https://twiggyandopal.blogspot.com/2016/07/the-infamous-six-minute-circle.html
Night Quilter: https://nightquilter.com/tag/six-minute-circle/
Orange Peel: Another classic patchwork design that lends itself well to a modern style and to borders. Orange peels can be pieced or appliquéd onto individual block or border strips. There are lots of design opportunities with this curvy shape.

Appliqué orange peel tutorial, Jenny Doan style: https://www.youtube.com/watch?v=5tyAig7XupI
Basic pieced orange peel block tutorial: https://www.youtube.com/watch?v=YikGnjJMEVc
Dresdens, New York Beauty “Suns”
More classic blocks you can use to add some curviness to your border are Dresden Plate and New York Beauty blocks. Each of these block patterns is really an entire category of blocks, ranging from relatively simple (a basic Dresden Plate with 2-4 blades per quarter circle) to wildly complex (some of the New York Beauty variations). I’ve used a Dresden Plate to illustrate some ways you might use these “rounded design” blocks in a border. You can also make wonky versions of Dresden Plates.
(http://thegirlwhoquilts.blogspot.com/2012/10/modern-dresden-plate-tutorial.html) or improv New York Beauty blocks (https://seattlemodernquiltguild.com/2020/01/08/january-2020-giving-quilt-improv-new-york-beauty/).
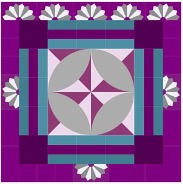
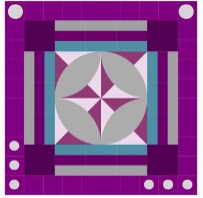
Don’t want to stitch a lot of curves? How about putting curves only on some cornerstones? Try a circle on each corner of this border. Or, piece some Dresden or NY Beauty blocks and put one (or three) in each corner.
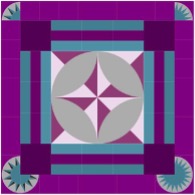
The “Sparrow” block from Heather Black on MQG site (below) would also look good in the cornerstone blocks.

Bias tape arcs or waves
Finally, if stitching curves just isn’t your thing, use bias tape made from a favorite fabric to create a curve. Most of the shapes described above can be made using bias tape. It is easy to do (and a handy skill to learn if it isn’t already in your toolbox).
For some additional cool ways to create and use curves made with bias tape, check out Latifah Saafir’s Fresh Quilting Episode: https://www.youtube.com/watch?v=4RinV55gyDE
Great tips for using bias tape to make designs on quilts: https://mamalovequilts.com/2016/02/4-things-you-need-to-know-to-make-bias.html
Making bias tape (with or without a bias tape maker): https://www.youtube.com/watch?v=uI1-bPIqcXs&t=1s
July Summary
| Mild |
Medium |
Spicy |
| Bias tape arcs or waves or orange peels or loops |
Improv wavy curve or insert |
Precision pieced wavy inserted line |
| Simple cornerstone blocks with curves |
Appliquéd circles or ovals or organic shapes |
New York Beauty blocks |
| Make one block with curves for each section of the border (2 or 4 for most layouts) |
Dresden Plates |
Make more blocks |
| Orange Peels (Appliquéd) |
Orange Peels (pieced) |
Make full borders with more complicated blocks |
| Drunkard’s Path (if you aren’t making many of them) |
Drunkard’s Path (lots of blocks) |
|
Don’t forget to tag your progress: #seamqgsalsaBOM
August Instructions
We will aim to post the next instructions close to the August meeting. Stay tuned, and happy sewing!