
We will be doing the Block of the Month a little differently this year. There are so many great medallion quilts out there these days and we thought it would be fun to join in on that. We will start with a center block for January and add a border each month through September. For October and November, we’ll give a little more info, ideas, and tips on how to turn your top into a finished quilt.
We’re making this up as we go, to create a cohesive look and not make it too busy, so we are not yet sure of a finished quilt size or total yardage needed. You are welcome to make all or just a few of the borders – it’s all up to you!
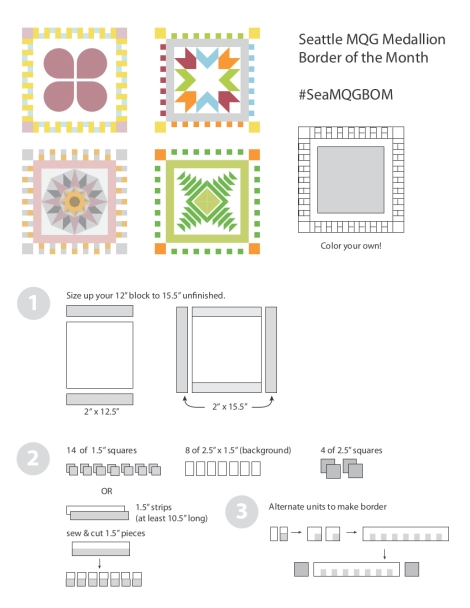
Our Medallion coloring sheet:

JANUARY:
For January, everyone should be picking out their color scheme and making a 12.5″ center block. Your center can be any block from our 2014 BOM program or another quilt block of your choosing. Some have suggested using old bee blocks or abandoned WIPs (Works in Progress) for their center.
FEBRUARY:
MARCH:


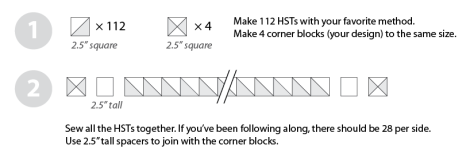
APRIL:
 MAY:
MAY:

JUNE:


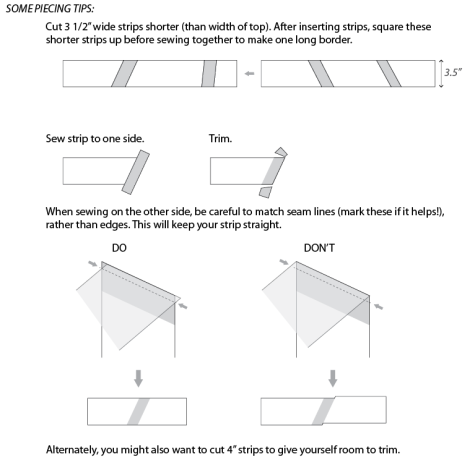
JULY: The directions for July are a little longer so please click on either of the coloring pages below to be taken to the full instructions.

 AUGUST

SEPTEMBER

October
We are fortunate to have many talented members in our midst, one of whom is Debbie J. of A Quilter’s Table. Debbie is known amongst us at being a very talented and prolific quilter as you can see on her blog and instagram. We love when Debbie brings her work in to show us what she’s been working on! She’s been featured on several popular sewing blogs and we were thrilled when she agreed to help us finish up the year with a few round-ups of tutorials to finish your Seattle MQG medallion quilts. She will be covering quilt backs and basting this month, quilting in November, and binding and labeling in December. Without further ado, here’s Debbie.
* * * * *
So it’s time to start thinking about finishing up our BOM medallion quilts since the last border was posted in September. Here’s a little round up to get you going!
Heather/The Sewing Loft‘s Learn How to Square a Quilt has some helpful photos and tips on squaring your quilt, whether you do it before or after quilting or both.
If you’re wanting to make a basic quilt backing with 1 length of fabric, consider Angela/Cut to Pieces‘ Quick Tip for Quilt Backings, and it just might save you some frustration.

If you’re going for a pieced back, take inspiration from these . . .
Lee/Freshly Pieced made “Twin Quilts for Twin Girls” with paper-pieced blocks from her Vintage Quilt Revival, but what if you recreated your medallion’s center block and then surrounded it with negative space?

BGelhausen on flickr made this beautiful “Christy’s Quilt Back”. Envision a back for our medallion quilts echoing some of the elements on the front, mixed amongst those solids – wonky triangles, Raspberry Kiss blocks, flying geese – or a unique element you added to your own quilt.

A more minimalist medallion such as Beth/plum and june created would be an awesome backing! Again, plenty of solid negative space with a few shapes from the front pieced in.

As for basting that quilt – choose your method!
Amanda Jean/crazy mom quilts shows us Pin Basting.

If you’re up for Spray Basting, Lindsay/Lindsay Sews shares a handy tutorial on Craftsy.

Or if you like the slow sewing movement, consider Thread Basting with the help of Purl Soho.

There are plenty more ideas for creatively pieced backs in this Quilt Backs Pinterest group. No matter what you decide, let’s work at making progress on our 2015 BOM medallion quilts, and be sure and share on Instagram with hashtag #seamqgbom!
November
Medallion quilts seem to be all the rage this week with a few of our members out at Glamp Stitchalot in Michigan. How are yours coming back here? Debbie of A Quilters Table is back with another list of fantastic resources for you this month on the topic of quilting. Be sure to share your progress online with #SeaMQGBOM, we’d love to see! And if you’ve been watching from the sidelines but not joined in yet – it’s not too late. The tutorials will remain up on our blog.
* * * * * *
It’s true many of us are still piecing our medallion quilt tops, but there’s nothing wrong with thinking ahead to the quilting – sometime’s that’s motivation in itself!
Let’s start out with several options sewn with your walking foot …. Straight-line quilting is always a reasonable consideration and you’ll find lots of helpful advice from Nicole/mama love quilts with her 10 Tips for Trouble-Free Straight Line Quilting, as well as in Straight-line Quilting Tips and Tricks from the MQG.

A variation of straight-line, matchstick quilting, gives a quilt really great texture and a wonderful modern look. Check out this Matchstick Quilting Tutorial by Kelly/Express Yourself with Sulky.

Then there’s always Cross-hatch quilting. Lucy/Charm About You has a helpful tutorial.

Here’s Erica/kitchen table quilting‘s Desert Blooms Medallion, so you can see an example of a medallion with cross-hatch quilting. Notice it can be done to create squares or diamonds.

A favorite pattern for any quilt that has a focal point in its center is spiral quilting, and Linda/Flourishing Palms shares her 10 Tips for Spiral Quilting Success.

Ok, some of you are going to want to free-motion quilt your medallion, aren’t you? For general helps, check out Tips for Free-Motion Quilting a Larger Quilt from the MQG, and 5 Fixed for Common Free-Motion Quilting Problems by Christa/ChristaQuilts on Craftsy. The Clamshell Loop (below) by Elizabeth/don’t call me betsy or Dogwood Quilting by Elizabeth Hartman would be fun choices.

For more ideas, see the curiously named pin board fmq + wf etc.
So there! Oodles of ideas for you to consider. Can’t wait to see what you choose!
December
It’s been quite an adventure with our BOM quilts and I bet you thought I forgot to post our final installment… and you would be correct. Sorry to those of you who have been waiting for this final 2015 BOM post! Debbie has had it ready and I completely forgot to post it – let’s blame that on the holiday craziness. Anyhow, here at the end of the year Debbie / A Quilters Table has put together another fantastic collection of methods and techniques to help you finish up those quilts – whether they are your 2015 BOM or another quilt you’ve been working on. We’d love to see your finished BOM quilts at the January meeting if you’ve been following along! I’m off to check out some of these binding tutorials for another quilt now… Take it away Debbie!
* * * *
Now that we’ve mulled over quilt backs and basting and considered a quilting plan for our medallion quilts, it’s time to face the final steps – binding and labeling.
You probably have your favorite basic binding method, but Leanne/she can quilt has a helpful post that covers both hand and machine stitched binding if you haven’t already tried both ways.


A faced or knife-edged binding is a nice consideration for some quilts, and I really like using this tutorial by Anita/Bloomin’ Workshop.

If you prefer a faced binding with mitered corners, I also recommend this tutorial by Elizabeth/OPQuilt. I’ve used both methods, have had good success with each, and find the 2 styles basically a matter of preference.

Ellyn/ellyn’s place has a great tutorial for two-toned binding, another consideration for a unique finish.

Now on to labeling! Always a good idea, right?
Hand-written labels can be sewn right into the corner of your quilt, as shown by Marla/@pennylandequilts.

If you want to do something more, and make a supply of labels while you’re at it, consider Kelsey/Lovely and Enough‘s DIY Professional Quilt Labels.

And if you really want a hand-stitched look, why not try Sarah/FairyFace Designs‘ Hand Embroidery tutorial.

Caroline/sewcanshe also has some quilt label printables available for download, if that’s more your style.
So there’s a few ideas for you! There are even more in my Quilt Binding Tutorials and Quilt Labels pin boards, and there’s also the SMQG quilt finish round-up board if you’d like to peruse all the techniques I’ve shared for the SMQG 2015 BOM. So go at it! I can’t wait to see your finished quilts!