
2018 BOM - Airplane Science and Manufacturing
Supplies and Runway – February
Welcome to the 2018 Seattle Modern Quilt Guild Block of the Month! This year, we are going to do a quilt-as-you-go quilt. Each month, we will piece and quilt one or two blocks. In December, I’ll show you how to trim all of the blocks down to the same size, and attach them all together.
The theme for our quilt is Airplane Science and Manufacturing. I’m an aerospace engineer, so I am combining two of my favorite things to bring you this quilt. As a nerdy bonus, each month I’ll teach you a little bit about an airplane related science, or share some fun airplane manufacturing techniques. There’s nothing I love more than a captive audience to teach science-y things to
The final quilt size is a bit on the smaller size, 45” x 60”. We will be making 12 different quilt blocks, each with a final size of 15” square. Please note that each month, the block we piece and quilt will be larger than 15”. This is to make sure that we have enough excess material after quilting so that we can cut each block down to size. We won’t be cutting the blocks until the end, so don’t worry about cutting them now. Also don’t worry about trying to square up your quilt block, or cutting any extra bits off. Just quilt it onto your batting and you can cut it off later. You don’t need to be exact on the size of the backing and batting fabrics, as long as they can cover the entire front of the block. This is a great quilt to use up those leftover bits of batting you have lying around!
I’ve put together a material list for you to get started. The quilt top will have a background color, and accent colors. This quilt would be a great way to use up some of those fat quarter bundles you bought 3 years ago with good intentions but haven’t gotten around to using yet. You can also use bits of scraps, random fat quarters, or use this as an excuse to buy some new fabric you’ve been eyeing (that’s what I did!)
You will need the backing fabric from the start, since we are quilting a block every month. I cut 12 fat quarters down to size, and then was able to use the cut off part as additional accent fabric. You could also get some yardage of fabric, and cut it into squares.
I am using a fat quarter bundle of Alison Glass Chroma for this quilt, as well as a solid gray for my background fabric. We won’t be using either binding fabric until November, so you can wait to purchase it. I’m going to show you how to join each block together using sashing/binding strips, but if there is another method you want to try out, I would encourage you to give it a shot!
Supply List:
Backing
- (12) fat quarters – trim to 16”x16” ish if you want to preserve fabric –OR–
- 2 3/4 yards of fabric, cut into (12) 16”x16” blocks
Batting
-
(12) 16”x16”ish bits of batting
- use leftover bits you might have around –OR–
- get a bag of full size batting –OR–
- 1.5 yards of 90” wide batting
Front
- miscellaneous accent fabric scraps
- 2.5-ish yards of background fabric
Assembly Binding
- 1/2 yard of fabric
Quilt Binding
- 1/2 yard of fabric
Additional supplies – not necessary, but could be helpful!
- >15” square quilting ruler (definitely not necessary, but would be helpful)
- Fabric marking pens (Frixion or disappearing ink pen)
- Elmer’s Glue with fine tip
- Freezer paper
- Spray starch
- Wonder-Under or other fusible web for applique (16” square)
Runway Block
Since we have 12 blocks to make in 11 months, we have to get started now! But this is a real easy one. This block is based on what a pilot sees as they are approaching the runway right before landing. If you haven’t done a lot of quilting, it is a great block to do some simple straight line quilting, or you can jump right into free motion quilting.
Materials:
16” x 16” (ish) piece of batting
16” x 16” (ish) backing fabric
(2) 7” x 16” pieces of background fabric
(1) 10.5” x 16” piece of accent fabric
Piecing:
Our pieces of fabric have to be cut on the diagonal to create the perspective a pilot sees as they approach the runway.
Make two marks on the top of the accent fabric 3” away from each edge. Line up your ruler at the bottom left corner and the left 3” mark on top, and cut. Do the same on the right side.

Make a mark on the bottom of one of the background pieces, 3” away from left edge. Line up your ruler from the top left corner and the 3” mark on the bottom and cut.

Make a mark on the bottom of the second background piece, 3” away from the right edge. Line up your ruler from the top right corner and the 3” mark on the bottom and cut.

Sew all 3 pieces together using a ¼” seam allowance. Use the photo for help on the layout of the pieces. Since we are making our blocks large and trimming them down after quilting, it’s okay if the pieces don’t line up exactly in the corners.
Quilting:
Sandwich your backing piece, batting, and top, and baste. Quilt however you like. I choose to do echo the perspective of this block using straight-line quilting.
That’s it! I can’t wait to see what you come up with for quilting and fabric choices. You can use the hashtags #SeaMQGBOM2018 and #ASaMQuilt to show off your work to everyone else. Please let me know if you have any questions! You can send me an email at seattlemodernquiltguild @ gmail . com or message me on instagram @itskimsinsta.
Supersonic – March
We’re going Supersonic yo!

These days, commercial airplanes don’t travel faster than the speed of sound (767 mph in dry 68°F air). In the 70’s, the British Aircraft Corporation manufactured the Concorde, which is one of only two commercial aircraft to fly at supersonic speeds. However, there are many military airplanes that regularly reach supersonic speeds.
Shock waves are formed when an airplane forces its way through the air when traveling faster than the speed of sound. You can’t see this happening, but sometimes you can hear it as a sonic boom.
This website has a short video on how shock waves are formed! http://howthingsfly.si.edu/aerodynamics/shock-waves
Now that we know all about supersonic speeds and shock waves, let’s make a quilt block inspired by them! We are going to piece this block as we quilt it, and then attach it to the backing once the front has been quilted. Jera Brandvig has a great tutorial on this type of quilt as you go, and I could only dream of creating a tutorial as great as hers. This would make some great supplemental reading to this guide. http://quiltingintherain.com/2014/02/quilt-as-you-go-log-cabin-tutorial.html
I made this block as a rainbow, because I love rainbows, but I would encourage you to arrange your fabric however you want! Ideally, you’ll want to at least alternate the strips so you it looks like shock waves. You could get away with 2 different accent fabric pieces and alternate them, or do 6 totally different colors. The block will start and end with your background fabric.
Materials:
- 16” x 16” (ish) piece of batting
- 16” x 16” (ish) backing fabric
- 5” x 20” piece of background fabric
- (6) 2.5” strips of different colored fabric
Cutting:
From your background fabric, cut the following:
- 5” x 5” square
Leave the rest of your background fabric intact. Instead of pre-cutting the last pieces, it will be easier to measure at the end, just to be sure that you are covering the rest of the batting.
Now cut your accent fabric pieces. Here’s a diagram of what each piece is labeled.

Accent Fabric A:
- Piece AA: 2.5” x 8.5”
- Piece AB: 2.5” x 10.5”
Accent Fabric B:
- Piece BA: 2.5” x 12.5”
- Piece BB: 2.5” x 13.5”
Accent Fabric C:
- Piece CA: 2.5” x 13”
- Piece CB: 2.5” x 14.5”
Accent Fabric D:
- Piece DA: 2.5” x 13”
- Piece DB: 2.5” x 15”
Accent Fabric E:
- Piece EA: 2.5” x 13”
- Piece EB: 2.5” x 14”
Accent Fabric F:
- Piece FA: 2.5” x 11”
- Piece FB: 2.5” x 10”
Sewing:
Take your piece of batting and mark a line horizontally down the middle. We want the waves to go move horizontally through the middle of the block. Mark another line ½” away from the edge of the batting. Line up the 5” background square so that one corner is on the horizontal center line, and two corners are on the ½” line.

Quilt the background square onto the batting however you like! Since I am lazy, I did all straight line quilting with my piecing foot to make this block, but you could totally free motion quilt it if that’s your jam.
Take piece AA and line it up with the top edge of the background square. This step is exactly the same as if you were regular piecing, we’re just going to attach it to the batting at the same time. With right sides together, sew with a ¼” seam allowance.

Flip the piece and iron it open; quilt this piece down to the batting.

Take piece AB and line it up with the bottom edge of the background fabric, and the same edge of piece AA. With right sides together, sew together with a ¼” seam allowance.

Flip the piece and iron it open; quilt this piece down to the batting
Keep repeating these steps to add the rest of your accent fabric pieces in the order below. Feel free to mix up your quilting for each section. I did straight lines that were different distances apart, and a few that are curvy lines instead of straight. I also followed some of the pattern motifs in my fabrics. You just want to make sure that your fabric strips are covering the entire piece of batting when you sew and quilt them down.

Once all the colored fabrics have been attached, we need to attach the final background piece. Take your leftover background piece and cut it to fit the last corner. I didn’t give you a measurement for this, because the final size will depend on your seam allowances and quilting density. Position the background piece onto the corner. Make sure that your piece will cover the last of the batting once it’s been flipped and quilted. With right sides together, sew with a ¼” seam allowance. Flip the pieces and iron it open; quilt these pieces down to the batting.

Yay! Our quilt block is now all pieced and quilted! Wasn’t that easy?
Flip your block over and trim off the extra fabric, but don’t cut into the batting yet. This will make it easier to line up the top with the backing.

Sandwich your top and back and baste in the method of your choosing. The backing needs to be attached to the top in some way; I choose to stitch in the ditch between each color of fabric.
And now your Supersonic block is done! Next month we’re going to squeeze in two blocks. You can use the hashtags #SeaMQGBOM2018 and #ASaMQuilt to show off your work to everyone else. Please let me know if you have any questions! You can send me an email at seattlemodernquiltguild @ gmail . com or message me on instagram @itskimsinsta.
Contrails and Stringer Deflections – April
This month, we’re making two blocks! It sounds like a lot, but they’re light on piecing, so I think it will be manageable.
Does anyone else find the conspiracy theory about chemtrails hilarious? We’re talking about the white lines in the sky that form behind airplanes. They’re not chemtrails, they’re actually contrails. Contrails are clouds that are formed when water freezes around small particles from airplane exhaust. Please enjoy this entertaining article on chemtrails, as well as a few other aviation based conspiracy theories: http://www.telegraph.co.uk/travel/news/chemtrails-contrails-and-other-aviation-conspiracy-theories/
Now, onto our Chemtrails block! Here’s what you need.
Materials:
(1) 16” x 16” (ish) piece of batting
(1) 16” x 16” (ish) backing fabric
(1) 16” x 16” background fabric for front
(2) 1.5” x 22” accent fabric strips
Sewing:
This block is super easy and improv-y. The method is slice, sew, slice, sew. Easy!
Take your background fabric and place your ruler so that it goes from the top left corner (ish) towards the bottom right corner (ish). Since it’s improv, you can cut however you want. Cut your background fabric into two pieces along the ruler.

Sew one of your accent fabric strips in between the two background pieces of fabric. Press the seams however you want; there’s no piecing police here.
Now cut this block in half again, maybe going from the top right ish corner towards the bottom left ish corner. But maybe you like to see parallel contrails? The options are limitless; cut your block however you please!

Sew the second accent fabric strip onto one half of the background. Press the seam.
Now you’re going to want to line up the second half of the block onto the accent strip, making sure that your first accent piece will still be in line. I drew some registration marks on the accent piece in line with the seams from the first half, and then lined up the second half seams to the lines.

Once you’ve got the second half lined up with the first half, sew and press. Give your whole block a nice blast of steam and congrats! The Contrails top is done!
Baste your block top to the batting and backing using your preferred basting method, and quilt.

Stringer Deflections
This block idea actually comes straight out of an analysis I did at my day job. A stringer is a longitudinal structural piece in a framework, especially that of a ship or aircraft (Dictionary.com). Since this is an airplane quilt, we’re going to talk about stringers in an airplane wing. On an airplane wing, there are stringers that run from the fuselage of the airplane down to the wing tip. These stringers give the wing skin stability, and allow the skin to be thin; otherwise you might end up with a wing skin that is inches thick, and that would weigh a lot! By themselves, stringers are long and thin, which makes them quite flexible. They don’t get their strength until the stringers and the skin are attached together.
I work in computer-aided metrology, which is the science of measurement. We use many different instruments to measure airplane parts, and let quality engineering know if the parts are within their designed engineering tolerances. Since stringers are long and skinny, they tend to be noodley and move all over the place. Some of the stringers in airplane wings can be up to 120 feet long, and only about 8 inches wide!
Here’s a short video on Boeing’s 737 Panel Assembly Line, which attaches stringers to wing skin. The video doesn’t specifically mention that they are attaching the stringers to the skin, but that’s what it’s doing. https://www.wired.com/2016/10/meet-giant-robot-builds-boeings-wings/
Our quilt block is loosely based on an analysis I did of a stringer after it had been trimmed. The piecing of the block will represent the stringer, and the quilting is (will be…) loosely based on the deflections I saw when analyzing the measurement data taken of the stringer.
Materials:
(1) 16” x 16” (ish) piece of batting
(1) 16” x 16” (ish) backing fabric
(1) 15” x 15” background fabric for front (will be pieces A & B)
(2) 3” x 5” background fabric strips (pieces C & D)
(1) 3” x 15.5” accent fabric strip (piece E)
Sewing:
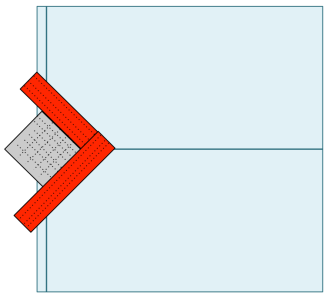
Cut the 15” background fabric square on the diagonal to make two triangles. These are pieces A and B. Arrange your pieces like the photo below.

Sew pieces C and D onto the accent fabric piece E. Press seams.
Sew piece A onto piece CDE. I folded each piece in half and finger pressed to create an indentation; this makes it easier to ensure that the accent fabric piece is centered in the block.

Sew B piece onto A-CDE. Use the same technique as the previous step to make sure the accent piece is centered in the block.
Yay! This block is now pieced! I told you this month had easy piecing tops. You can quilt this however you want, but if you want to show some deflection in your stringer, you can quilt it like I plan to below. It shows our stringer bending all over the place. This would definitely not pass inspection.

Hope these two blocks weren’t too stressful for you. Next month we’ll learn about industrial pressure cookers. You can use the hashtags #SeaMQGBOM2018 and #ASaMQuilt to show off your work to everyone else. Please let me know if you have any questions! You can send me an email at seattlemodernquiltguild @ gmail . com or message me on instagram @itskimsinsta.
Autoclave – May
Autoclaves!
This month’s block is brought to you by autoclaves! An autoclave is vessel that uses pressure and heat to treat the product inside it. In the airplane industry, we use composite to make airplane parts, and built-up composite needs to be cured before it gets its strength. The 777X airplane has the largest composite wings in the world, so Boeing needs the largest autoclave by volume in the world in order to cure the parts. The autoclave is so large it had to be built on site, and then moved over into the Composite Wing Center. The following article is about the move, and then I’ve also given you a link for a short video on the Boeing Composite Wing Center autoclaves.
https://www.youtube.com/watch?v=H2kUosgZmxU
If you find yourself in Everett and take a drive on Perimeter Road around the Boeing factory, you can see a second autoclave being built on site.
This block is inspired by what I see on a daily basis, large tools going in and out of the autoclave. Now onto sewing!
Materials:
(1) 16” x 16” (ish) piece of batting
(1)16” x 16” (ish) backing fabric
From your background fabric, cut:
- (piece A) 3.5” x 3.5″
- (piece B) 8.5” x 6.75”
- (piece C) 3.75” x 16”
From Accent Fabric A, cut:
- (piece D) 12.75” x 9.75”
From Accent Fabric B, cut:
- (piece E) 4.75” x 6.75”
Sewing:
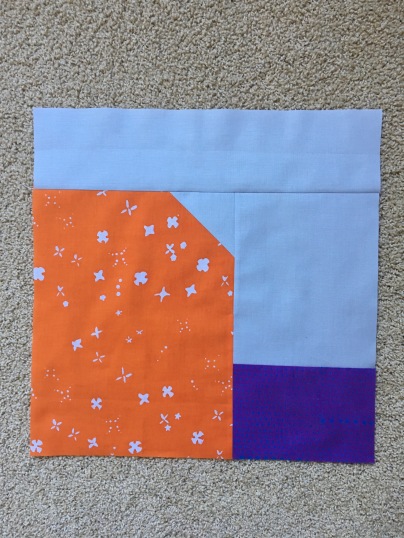
Arrange the fabric pieces onto your table like the picture below. This will help keep track of the pieces.

Draw a line from corner to corner of the wrong side of the A piece. Line it up in the top right corner of the D piece, right sides together.

Sew along the line. Trim the excess corner part, leaving ¼” behind as seam allowance.

Flip the background piece, and press.

Sew pieces B and E together on the short edge of piece B. Then sew the A-D piece to B-E. Sew piece C along the top. Use the picture below to make sure you’re sewing the right pieces together.

Baste the backing, batting and completed top together, and quilt.
That’s all for this month. Next month we’re going to talk about tooling! You can use the hashtags #SeaMQGBOM2018 and #ASaMQuilt to show off your work to everyone else. Please let me know if you have any questions! You can send me an email at seattlemodernquiltguild @ gmail . com or message me on instagram @itskimsinsta.
Tooling – June

Before I was measuring stuff, I was a tool engineer, designing tooling to help make airplanes. The tools we use are big jigs to hold pieces while they’re fastened together, or mandrels to lay composite up on before it’s cured, or templates for drilling holes.
This block is inspired by some of the tooling that is used to make a blade stringer. In my block, the red is the stringer, and the yellow is the layup tool. I choose to use 2 different red fabrics and 2 different yellow fabrics, to help add some dimension.
Materials:
(1) 16” x 16” (ish) piece of batting
(1) 16” x 16” (ish) backing fabric
From Color A1 (red in my block), cut one of each:
Piece G – 1.5” x 4.5”
Piece D – 1.5” x 9.5”
From Color A2 (red in my block), cut one:
Piece B – 7.75” x 9.5”
From Color B1 (yellow in my block), cut TWO:
Pieces A & C – 3.75” x 8.75”
From Color B2 (yellow in my block), cut TWO:
Pieces E & F – 7.75” x 7.75”
From background fabric, cut one:
Piece H – 1.5” x 3.75”
Arrange the pieces onto your table to help facilitate sewing.

Sewing:
Sew piece H onto the bottom of piece G, and press.
Sew piece E onto the left side of the GH block, and piece F onto the right side of GH. Press.
Sew piece D onto the bottom of piece B, and press.
Sew piece A onto the left side of the BD block, and piece C onto the right side of BD. Press.
Sew piece E-GH-F onto the bottom of A-BD-C. Press. Use a lot of steam. Steam is awesome.
I think it took me longer to cut out the pieces than to sew them together. You probably know the drill by now: sandwich the backing, batting and top together and baste. Quilt!
That’s half of our blocks done! Next month we’ll talk about a really fun airplane manufacturing process: wing to body join! Let me know if you have any questions, and use the hasthtags #SeaMQGBOM2018 and #ASaMQuilt to show off your progress.
Wing to Body Join and Laser Trackers – July
Okay everyone, this month is SUPER SPECIAL (to me) because it involves two of my favorite things about working at Boeing.
The first is Wing to Body Join. This is a process during the major assembly of an airplane, when the wings are fit and fastened to the fuselage of the airplane. It is seriously impressive to see the wings fly across the factory and slowly get joined to the fuselage. We actually just joined the first set of wings to the 777X airplane last week! Hooray! Here is a pretty sweet video on British Airway’s first 787-9, and it starts at the Wing to Body Join (but feel free to watch the whole awesome thing too) The three blue stands are a piece of automated tooling that helps to get the wing is just the right location for assembly.
https://youtu.be/SJZk9vNS8NE?t=60
Materials:
- 16” x 16” (ish) piece of batting
- 16” x 16” (ish) backing fabric
-
From fuselage accent fabric, cut:
- (1) 12.5″ x 3.5″ (piece E)
-
From wing accent fabric, cut:
- (1) 5.5″ x 5.5″ square (pieces F)
-
From background fabric, cut:
- (1) 5.5″ x 5.5″ square (pieces F)
- (2) 1.5″ x 4.5″ (pieces C)
- (2) 1.75″ x 4.5″ (pieces B)
- (4) 6.25″ x 6.75″ (pieces A)
- (2) 3.5″ x 2.25″ (pieces D)
Sewing:
First we’re going to make 2 half-square triangles for the wings using the 5.5″ x 5.5″ background piece F and the 5.5″ x 5.5″ wing accent fabric piece. Draw a line down the center of the background piece (on the wrong side) from one corner to the opposite.

Place this piece on top of the accent fabric piece, wrong sides together. Sew 1/4″ away from the line you drew on both sides. This is going to give us (2) half-square triangles using one square!

Once you’ve sewn the two lines down the block, cut it in half along the drawn line. Press the seams open, and trim each block to 4.5″ x 4.5″. These are both now piece F.
Lay out your pieces like the following picture. This will make it easier to sew everything together.

Sew both pieces D to the skinny ends of piece E and press the seams (however you want, no seam police here).
Sew piece C and B onto the top and bottom of piece F. Make sure your accent piece is oriented the right way so it looks like wings on an airplane! Press the seams towards piece C and piece B.
Sew pieces A onto either side of piece CFB.
Sew pieces A-CFB-A onto DED.
Now you’ve got a wing to body join block! Quilt in a way that makes your heart sing. Thanks to Kathleen for quilting this block for me.

Laser Trackers
Laser trackers are instruments that can measure large objects accurately by determining the position of optical targets held against the object (Wikipedia). I use this all the time to measure airplane parts. The instrument sends out a laser, and when the laser beam is reflected back at the instrument (using a mirrored surface), the instrument can calculate where the point is relative to the instrument. Once you’ve collected thousands of measured points, it can be compared to a nominal engineering model to determine the as-built condition of the object.
I work with laser trackers daily, and it is really exciting technology. This block is loosely based on laser trackers; the colored block represents the instrument, and the red dots in my quilting are points that the instrument has measured. I choose to quilt this block with heavy weight thread, so I could get it to look like it was actively taking measurements; I can’t wait to see how you choose to quilt this block. I also made another one with LEDs so it LIGHTS UP and gave it to a very special friend and it is one the best thing I’ve ever made. I’m going to be sewing with LEDs so often now!
This block is STUPID easy to piece, so spend some extra time quilting it; it’ll pay off in the end.
![]()
Materials:
- 16” x 16” (ish) piece of batting
- 16” x 16” (ish) backing fabric
-
From accent fabric, cut:
- 3.5” x 5.75” (C)
-
From background fabric, cut:
- 6.75” x 5.75” (B & D)
- 10.75” x 16” (A)
Sewing:
Arrange your pieces onto your table to help facilitate sewing like so:
![]()
Sew pieces B & D onto your accent fabric piece C on the 5.75” side. Press.
Sew piece A onto the top of BCD. Press.
Done. See?? Stupid easy? Now spend an hour quilting it like crazy! I made some French knots using red pearl cotton on the front and batting ONLY. The batting helped to hide all of the long connections between each knot (ain’t nobody got time to do each one individually). Then I basted the backing to the front/batting, and quilted lines connecting the French knots to the top center of the accent fabric piece.
Here’s a picture of my light-up laser tracker block, BECAUSE IT’S AWESOME.
![]()
Next month we’re going to do a block based on a fuselage! Let me know if you have any questions, and use the hasthtags #SeaMQGBOM2018 and #ASaMQuilt to show off your progress.
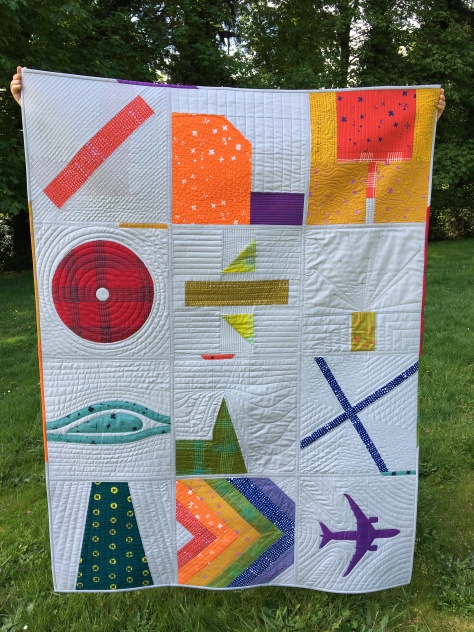
Also, I finally finished this quilt at the retreat in April, but I just realized I never posted a picture on the blog. So here is the finished quilt

Fuselages – August
This month we’re going to learn about fuselages, aka barrel sections, aka the area where you sit in the airplane! On the Boeing 787, the fuselage is made out of carbon fiber composite, and it is layed up in one circular section (instead of the traditional method of building it in halves). There are some really interesting machines that lay up the composite; please enjoy this short (and silent) video on fuselage layup.
https://www.youtube.com/watch?v=tmmrkswDHp0
Now, onto sewing!
Materials:
- 16” x 16” (ish) piece of batting
- 16” x 16” (ish) backing fabric
- 16” x 16” (ish) piece of background fabric
- 12” x 12” (ish) piece of accent fabric
- 4-5 sheets of freezer paper (optional, but makes it easier!)
- Spray Starch
- Small paint brush
- Elmers Glue + a fine tip applicator (optional – you could also use pins or double-sided tape)
Sewing:
Arrange your freezer paper (shiny side DOWN, on your ironing board) so that it is overlapping and at least 11.25” square. Iron it all together so you have one piece of freezer paper that is (at least) 11.25” square. I like to have a double layer of freezer paper (so it makes it a little thicker).
*If you’ve never used freezer paper, make sure you iron on the DULL side. The shiny side will stick to fabric multiple times, and peel off really easily without leaving any residue. This makes it easy to use it for making templates. If you iron directly on the shiny side though, it will make your iron all sorts of messy.

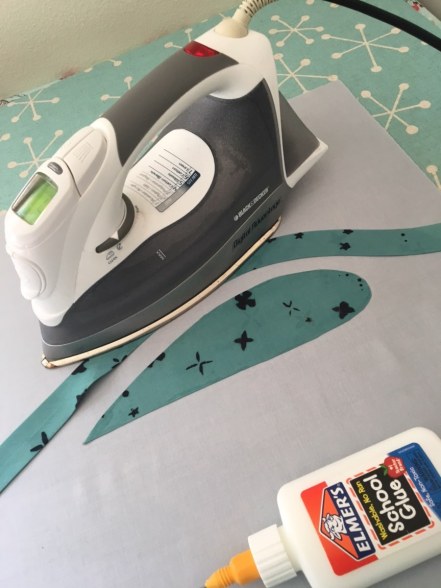
Now you need to cut out the fuselage shape from the freezer paper. I tied a piece of string to a pen to draw my circles, but you could use a circle template, compass, or free-style it. You need to draw a 11.25” diameter circle, and a 1.5” diameter circle, concentrically (sharing the same center point). Once you’re happy with your circles, cut it out.

Iron the freezer paper fuselage template onto your accent fabric piece, shiny side down. It should stick nicely to the fabric. Cut away the excess fabric, leaving about a ¼” seam allowance on the inside and outside circles.
We’re going to turn this into a faux-applique shape, which we will then glue down onto our background fabric piece. If you would rather applique this shape down the traditional way, do it! We’re going to go for the lazy yet efficient method though.
Cut some notches or slices into the seam allowance excess. This will make it easier to turn the curves, especially in the center. Try to leave a few threads worth of fabric uncut near the template (so you don’t cut into the front of your piece).

Now get your spray starch and paintbrush. This next step is very important. Twiddle your fake French mustache and say “un deux trois huh huh huh” in your very best French accent. If you didn’t giggle, drink some more wine and try again.
Back to the spray starch. Spray some into the cap into the cap of the starch bottle, until you’ve got it about half full. Let the foam settle, and now the cap is filled with some liquid starch.

Take your paintbrush and slash it through the air. Make Bob Ross proud. Dip it into the cup of starch, and start painting it onto the seam allowance of the fuselage. Only do a few inches at a time, so it doesn’t dry before it’s been ironed. You don’t need a ton of the starch, but you want enough to make the seam stiff and hold the crease.

Now fold over the wet edge towards the freezer paper, and iron it. Let the iron sit on the edge until it’s dry, which will only take a few seconds.

Keep painting, folding and ironing until you’ve turned over both edges of the fuselage. Go slowly, and be careful; irons are hot and like to burn unsuspecting fingers when they are least expecting it.

Pull out the freezer paper. You’ll see that the edges stay turned, and there’s a lovely sharp crease that stays right where you ironed it.

Save your freezer paper template!! We’re going to use it next month (or some month, I don’t know when) so you won’t have to waste more paper.
Next, we need to iron the fuselage applique onto the background fabric. I used elmer’s school glue with a fine tip applicator to put tiny drops of glue onto the seam allowance, but you could use a glue stick, double stick tape or just pin it down when you sew it down. I like to use glue because then you can wave the piece around like a flag and it won’t fall off.


Put glue on about half of your fuselage, then press it firmly to the background fabric. Using a hot, dry (no steam) iron, set the glue by placing the iron on top of the glued bits for a few seconds, until the glue is dry. If you don’t like the placement, you can peel the fuselage off the background fabric, and try again. Any glue will wash away when you wash the quilt (assuming you’re using washable glue).

Glue down the other half, and any other bits that need to be glued down. Now you’re done piecing the top of this block! And we didn’t even need to use our sewing machine.
Baste the top to the batting and background fabric. The first bit of quilting I did for this block was on the fuselage, to not only quilt everything together, but also attach the fuselage to the background piece. Make sure you sew all the edges down during your quilting to firmly attach the fuselage to the block. Then keep on quilting!

Hope you had fun with this block, and maybe learned some new tricks to make applique easier. Let me know if you have any questions!
Airfoils – September
Airfoils are the shape responsible for making airplanes fly! Air (or any fluid) move faster over the top of the airfoil, and slower underneath, which creates a pressure difference (thanks Bernouli!). This pressure difference is what gives airplane wings lift, and directly opposes gravity to fly! Drag comes into effect when you consider the movement of the fluid parallel to the motion. The jet engines suck-squeeze-bang-blow air (that’s a real thing, google it!) to produce the forward movement of the airplane, thrust. Here’s a short video of smoke moving over an airfoil so you can see how air moves to produce lift.
https://www.youtube.com/watch?v=6UlsArvbTeo
Now to the sewing! This block is another great no-sew block, because all of the attachment of the fabric to the background can be done during quilting. You can attach the applique before you quilt it, but that feels like a lot more work, might as well kill two birds with one line of sewing (see what I did there?).
Materials:
- 16” x 16” (ish) piece of batting
- 16” x 16” (ish) backing fabric
- 16” x 16” (ish) piece of background fabric
- 4” x 12” (ish) piece of accent fabric
- (2) 2” x 18” pieces of BIAS CUT accent fabric
- 4-5 sheets of freezer paper (optional; you should be able to cut the airfoil piece of out of freezer paper from last month)
- Spray Starch
- Small paint brush
- Elmers Glue + a fine tip applicator (optional, you could also use pins or double-sided tape)
Sewing:
First, take your (2) pieces of 2” x 18” bias cut fabric and turn it into single fold bias tape. Fold both long edges towards the center, and press. Set aside.
Cut out the airfoil shape, which you can download airfoil shape. It should fit on a standard sheet of paper, and should be printed at 100% size. But if you print it bigger or smaller….. who cares, it’s your quilt! Copy this onto your freezer paper, and cut out a freezer paper airfoil template.
Iron the freezer paper template on the backside of your accent fabric piece. Cut out the fabric, leaving about 1/4” around all sides. Use the same technique from last month to make a faux applique piece. You might need to be creative around the trailing edge (pointy end) of the airfoil to get it to lay nicely. Pull out the freezer paper.
Put a fine line of glue around the seam allowance of the airfoil, and position it in the center of the background fabric.

Use a dry, hot iron to dry the glue.

Before you glue down the bias tape, we want to try to stretch it a tiny bit so that it will lay where we want it. Carefully position the bias tape on the top of the airfoil where you want it. Use my picture for placement, but we want it to look like the airfoil is cutting through the air. Start the bias tape near the centerline of the airfoil on the leading edge, and carefully curve it around the top of the airfoil. Use your iron to help nudge the fabric along, and set it in the shape that you want. Once you’re happy, use the glue to tack it down.
Repeat with the bottom piece.

Congratulations! The top is all “pieced” now! All that is left to do is baste the top, batting and backing together, and quilt it all together. Make sure you attach the applique and bias tape to the background during quilting, or you’re in for a sad surprise when you wash this quilt.

TURBULENCE – October

How many of you are scared when there’s a little too much turbulence on your flight? Planes are designed to handle loads way bigger than a little bit of bumpy turbulence, so it’s all perfectly safe. Turbulence covers a lot of different types of instability of the air around the airplane, and can be caused by wind, air pressure, temperature differences, mountains, nearby weather……
Here’s a quick article about three different types of turbulence you might encounter during your next flight. The photo in section 2 is what inspired my quilting for this block! I had plans to do some FMQ to get it really crazy, but life happens.
https://www.popularmechanics.com/flight/a5354/4327148/
Materials:
- 16” x 16” (ish) piece of batting
- 16” x 16” (ish) backing fabric
-
From the background fabric:
- B: 5.25” x 10.75”
- C: 16” x ~7” DON’T CUT YET!!!!
- E: 7”ish x 16”? **
- F: 7”ish x 16”?**
- **Read the whole post before you cut anything! Debbie has a fantastic tutorial on Improv Spikes that you can follow to help with this block!
-
From accent fabric:
- A: 5.25” x 5.75″
- D: 5” x 16”
Sewing:
Okay, full disclosure. I don’t really do improv, and I don’t enjoy not knowing how to do the math for the angles of this mountain. Luckily for me, the lovely and wonderful Debbie @aquilterstable has a tutorial on making improv spikes, which would make an amazing mountain!
Here’s a link to her very well written tutorial on improv spikes. Try to make an improv spike that’s 5” x 16”. If it’s bigger or smaller, it’s no big deal, that’s why we didn’t cut piece C right away!
http://aquilterstable.blogspot.com/2017/09/improv-spikes.html
Sew together pieces A and B on the short edge!

Sew your improv spike (DEF) onto piece AB!
Now is the time when you can figure out how big you should cut piece C. It’ll be 16” tall, since that’s how big our block is. But how wide should it be?? Measure your A-B-improv-spike block. Take that number, and subtract it from 16.5” (the extra half inch accounts for (2) quarter inch seams). That’s X. So cut your background fabric piece C to 16” x X”.
Sew your background piece C to the A-B-Improv-stripe piece, and the piecing is done! I used the photos of airflow over a mountain to inspire my quilting, and did some walking foot quilting. If you want to be really ambitious, some spirals would look really amazing on the right of the mountain.
Can’t wait to see what you come up with! Let me know if you have any questions! @itskimsinsta on the Instagram!
Dreamliner – November
We’re finally on the last block! Once we’ve completed this block, all we have to do is put the whole thing together and bind it!
The 787 Dreamliner was the first program I worked at Boeing, so it will always hold a special place in my heart. It’s innovative, new, plastic, and awesome. It is very rewarding for me to fly on one and know that I have personally made differences in the design and manufacturing of such an amazing airplane. Here a link to a video of the 787-9 crew practicing their performance at Farnborogh, an airshow in England. It’s quite impressive what this crew can do with a commercial airliner!
https://www.youtube.com/watch?v=GZRKm6PG918
For this block, we’re going to make a fabric sticker of the 787-8, and use fusible web to attach it to the background fabric.
Materials:
- 16” x 16” (ish) piece of batting
- 16” x 16” (ish) backing fabric
- 16” x 16” (ish) of background fabric
- 12” x 11” (ish) of accent fabric
- 12” x 11” (ish) piece of fusible web (like Wonder-Under)
- (2) Pieces of freezer paper
- Pen or marker
Sewing:
First, print out this homemade PDF with the airplane template. Print it at 100%, and tape the pieces together so you’ve got one airplane. If you don’t print it at 100%, your airplane won’t be to scale, which is important (to me!)
Iron the 2 pieces of freezer paper together, overlapping them by 2”-3” so that it will cover the entire airplane template. Place the freezer paper on top of the template, and trace the airplane onto the freezer paper.
Iron the fusible web onto the back of your accent fabric piece. It is really important to do this before you cut out the airplane otherwise you’ll end up making a mess out of fusible web trying to attach it later. Just trust me on this; don’t make the same mistake I did!
Iron the freezer paper airplane template onto the accent fabric piece, and carefully cut it out. I found using small applique scissors with a really sharp tip to be the most helpful during this.
Once the airplane is cut out of fabric, peel off the fusible web backing paper, position the airplane onto the center of the background fabric piece, and iron it on. Yet another block that we’ve completed without sewing!
Baste the airplane quilt top, batting, and backing fabric together using your preferred basting method. Then quilt however you want! I used a blanket stitch to carefully go around my airplane to make sure that it was attached really well, and then quilted some curvy lines echoing the airplane to add some interest into the blank spaces.
Extra credit
This month, we’re also going to do some prep work for final assembly, so that there is less work to do in December when finishing the quilt. We are going to make all of the binding that we’ll need to put all of the blocks together.
Materials:
- 5/8 yard of binding fabric
For assembly of the quilt, we’re going to use single fold binding to attach the pieces. We need 544” of binding.
To get 544” of binding, you will need 14 strips of WOF. This a conservative estimate claiming that the WOF is 40” instead of 42”. Cut (14) 1.5” wide strips of fabric from your binding fabric.
Now you have a few choices, depending on your sewing style:
- Cut and iron more strips of fabric than you need, and avoid sewing anything together (maximizes waste, but minimizes work!)
- Cut your strips out now, put off ironing them for now, and iron them as you use/need them
- Sew all of the strips together into one mega strip, iron it in half, cut each piece to the appropriate size, and be ready for sewing in December
- Make it up as you go
I made it up as I went along. I cut out a bunch of strips, sewed some accent fabric pieces into the middle of some of them, ironed them all in half, and just grabbed binding strips from the pile whenever I needed one when I was putting the quilt together. If a piece wasn’t long enough, I grabbed another one. Towards the end, I was sewing binding strips together to get strips that were long enough, but I tended towards “more waste less stress” than trying to figure it all out ahead of time.
I think the ideal way to go about this is to (at the very least) prep (18) 16” long strips and (4) 64” long strips. This will put you in a very good position to quickly put the quilt together next month!
Extra Extra Credit
If you’re feeling particularly motivated this month, you can do some extra extra credit to prepare for the final assembly next month.
Trim all of your blocks to 15” square. This is where a large ruler comes in handy! Here is my carnage.

That’s all for now! Let me know if you have any questions, and get ready for final assembly next month!
FINAL ASSEMBLY
Hey everyone! I am so sorry this last blog post is being post so late! But now, you’ll be able to finish this quilt and work on the 2019 BOM. This month, we are completing the final assembly of our quilt. For our last fun airplane video, I found this great one that shows how the Renton plant builds a 737 in just 9 days. That factory moves so quickly and non-stop, it’s simply amazing.
https://www.youtube.com/watch?v=liZ0WEEsuz4
To start out, if you didn’t do the extra credit or extra extra credit last month, go back and do those.
Materials:
All 12 of your quilted blocks, cut to 15” square
544” of single fold binding (1.5” cut, .75” finished)
Elmer’s washable glue with a fine tip applicator
Thread that matches your binding
Sewing:
This method for assembling a quilt comes from my experience making Alyssa Lichner’s Technicolor Galaxy Block of the Month, which I highly recommend if you are newer to quilting and sewing.
Keep this chart handy, as it will help you see the layout for the blocks. I’ve given each block a number, which should make it a little easier to keep track. Like I said last week, we are going to put together the columns first, and sew the 3 of them together at the end.

Grab block A1 (Stringer Deflections) and a piece of 16” binding. Using the fine tip applicator, place a thin line (or small beads) of glue on the BOTTOM of the block.

Line up the raw edge of the binding strip with the raw edge of the block on top of the glue, leaving a bit of overhand at the right and left ends of the block. We will cut these extra tabs off later; it’s better to have a piece that is too long and cut it down than too short. Use a dry, hot iron to dry the glue.


Turn the block over, and repeat the above steps to attach a binding piece to the back. On the block, you should have a stack of binding strip, quilt block, binding strip.
Take the block over to your sewing machine, and sew through the back binding, block, and top binding pieces using a ¼” seam allowance. This process is really similar to how you would initially attach binding to your entire quilt, except that you’re attaching binding to both the front and the back.

Repeat these steps for the following blocks: A2, A3, B1, B2, B3, C1, C2, C3. Blocks A4, B4, and C4 will not get a binding strip attached to them.
Take all of your blocks over to the ironing board, flip the binding pieces, and press the heck out of them. Use some steam, and make sure the crease is really strong.

Put all of your pieces aside except for A1 and A2. Place A2 towards you on the ironing board, and A1 above it. We are going to glue A1 and A2 together now. Jam the two edges of the blocks together so they are touching all the way down the length. I like to use a few pins to pin one of the blocks to my ironing board to make sure nothing moves.

Flip the binding strip that is on piece A1 over on top of A2. Make sure you have a decent amount of overlap. It should be a quarter inch of overlap, but it won’t hurt anything if there is more. Place a line of glue on the top of A2, flip the A1 binding strip over, and press using a hot DRY iron.


CAREFULLY turn pieces A1 and A2 over (they are joined together, don’t forget!) and repeat the step above to glue the back strip down to A2.
Bring this piece over to your sewing machine, and sew the binding strips to the quilt. I sewed a line just inside the binding strip, maybe 1/8”? Probably a little less. The goal is to sew both the front binding strip, the block, and the back binding strip down as close to the edge of the binding strips as possible. If you end up missing some of the back binding strips, it’s no big deal. You can either rip out the line you sewed and try again (ew), sew another line of stitches, or hand attach the back binding in the small section you might have missed.

I also sewed along the top edge of the binding strip to make the stitch lines even, but this is just for aesthetics, and is completely non-functional.
Repeat this process to attach block A4 to A3, B2 to B1, B4 to B3, C2 to C1, and C4 to C3, You should now have SIX blocks that are attached together.
Trim all of the hangover bits of binding strips, so that each column has straight edges on all sides.

Repeat this process to attach A3A4 to A1A2, B3B4 to B1B2, and C3C4 to C1C2. You should now have THREE long columns that are all attached together. Getting close! Below is the same process as above, which we follow to attach the A and C column to the B column.
Grab the B column (center column) and a piece of 64” binding. Using the fine tip applicator, place a thin line (or small beads) of glue on the RIGHT EDGE of the column.
Line up the raw edge of the binding strip with the raw edge of the block on top of the glue, leaving a bit of overhand at the top and bottom ends of the column. We will cut these extra tabs off later; it’s better to have a piece that is too long and cut it down than too short. Use a dry, hot iron to dry the glue.
Turn the column over, and repeat the above steps to attach a binding piece to the back.
Take the column over to your sewing machine, and sew through the back binding, block, and top binding pieces using a ¼” seam allowance.
Repeat this process to attach a piece of binding to the LEFT EDGE of the B column. Take your column over to the ironing board, flip the binding pieces, and press the heck out of them. Use some steam, and make sure the crease is really strong.
Now you just have to attach Column A and Column C to Column B and the assembly is complete! Use the same method that we used to attach the individual blocks. My only advice for this bit is be really careful when you’re gluing and sewing. The more care you take, the better change you have of successful attachment the first time.
THAT’S IT! Now you’ve got a quilt that only needs binding! Attach your favorite binding using your favorite method, tag your quilt, and bask in the glory of your finished quilt!
Thanks so much for quilting along with me this year! I hope you enjoyed making this quilt, and also hope you learned something too! Let me know if you have any questions, and have a great 2019!