
2019 BOM: Begonia – A mystery quilt!
Welcome to our 2019 Block of the Month project: Begonia.
Before we begin, I’d like to do a quick introduction for those of you I have not yet met:) Hi, I’m Stefanie! I’ve been quilting for almost 5 years and started designing my own quilts around the time we moved to Seattle in early 2017. Some of my non-quilty favorites include collecting houseplants, watching Survivor, and fixing anything that is broken. You can find me on Instagram @satterwhitequilts or on my website satterwhitequilts.com.
Dust off your Bloc Locs or get in line for the die cutter because we’re making half-square triangles!
In the age of instant gratification, I’ve decided to offer a challenge in patience and ambiguity by doing a mystery BOM design, revealing a new section of the quilt each month.
This first post is going to cover how the project will work and what to expect along the way.
- Project overview
- How to pick fabrics & example palettes
- How much of each fabric you’ll need
- Monthly schedule
Be Social!
Tag your progress pictures on Instagram!
#begoniaquilt #seamqg #seattlemqg #showusyourmqg
Design Inspiration
One of my favorite places to look for design inspiration is the natural world – from plants, rocks, and animals to evolution, weather, and outer space.
I’ve chosen the name Begonia for this project because Begonias are one of the largest genera of flowering plants with over 1,800 species and I hope to see a garden of variations when we’re finished!
Project Overview
The design is based on a 24×24 grid of 3″ squares.
Finished quilt dimensions: 72″x 72″.
We will be making 3 types of units for the Begonia Quilt: Half-Square Triangles (HSTs), Diamond in a Square (DSQ), and Rectangles.
We will construct the top by connecting units into rows and attaching the rows around a center block (like courthouse steps or a medallion quilt).
Row Assembly diagrams will be revealed at the beginning of each month along with links to tutorials and other helpful info.
I’ve made a quick skeleton of the design to give you an idea of the different pieces in each row.

In the Monthly Schedule section you will find the total number of units needed for the quilt, broken down into monthly assignments.
The cutting instructions are written using the 8-at-a-Time assembly method for Half-Square Triangles.
The guild has an Accuquilt GO! Fabric Cutter for our members to check out and use at sew-ins/meetings.
Choosing Fabrics
To make the Begonia Quilt you’ll need 10 different fabrics – one background fabric, one feature fabric, and 8 accent fabrics.
I have curated a handful of color palettes to inspire and guide you using colors from Robert Kaufman’s Kona Cotton line. There is no need to stick with solids, patterned fabric will incorporate nicely too!


Swatch Panel
The instructions and assembly diagrams will reference each fabric by number. Once you decide on your fabrics, I encourage you to make a swatch panel to help keep track of which fabric you’re using for each number.

Download begonia-swatch-panel
Fabric Needed
Yardage has been calculated for constructing HSTs using the 8-at-a-Time (8aaT) method and rounded up to the nearest 1/4 yard increment.
| FABRIC | QTY NEEDED |
|---|---|
| Fabric 1 | 4 yards |
| Fabric 2 | 3/4 yard |
| Fabric 3 | 1/4 yard |
| Fabric 4 | 1/2 yard |
| Fabric 5 | 1/4 yard |
| Fabric 6 | 1/4 yard |
| Fabric 7 | 1/4 yard |
| Fabric 8 | 1/2 yard |
| Fabric 9 | 1/4 yard |
| Fabric 10 | 1/4 yard |
Fat Quarters will not work for the 1/4 yard fabrics if using the 8aaT HST assembly method. If you use the 2aaT assembly method, you should be able to use FQs for the fabrics listed as 1/4 yard, except for Fabric 5.
Monthly Schedule
The table below shows how the project is broken up for each month.
The diagram shows the specific pieces we will be making each month.
Relevant information will be shown again in the segments posted each month.
I tried to divide the work up evenly for each month, front-loading the HST assembly to balance the longer rows in the later months.
| JANUARY | Choose Fabrics Begin prepping starting squares for HSTs Cut out rectangular pieces Make Diamond in a Square units Attach Row 1 to center Diamond in a Square unit |
|---|---|
| FEBRUARY | Make 20 HSTs (Row 2) Assemble and attach Row 2 |
| MARCH | Make 64 HSTs (Rows 3-5) Assemble and attach Row 3 |
| APRIL | Make 60 HSTs (Rows 6 & 7) Assemble and attach Row 4 |
| MAY | Make 48 HSTs (Row 8) Assemble and attach Row 5 |
| JUNE | Make 64 HSTs (Row 9) Assemble and attach Row 6 |
| JULY | Make 56 HSTs (Row 10) Assemble and attach Row 7 |
| AUGUST | Assemble and attach Row 8 |
| SEPTEMBER | Assemble and attach Row 9 |
| OCTOBER | Assemble and attach Row 10 |
| NOVEMBER | Assemble and attach Borders |
| DECEMBER | Finishing |

January Instructions
Part 1: Cutting
Cut starting squares for 8-at-a-Time HST assembly method
We can get (5) 7.75″ squares from one 7.75″x 42″ strip of fabric.
Set aside leftover pieces of Fabrics 1, 2, & 9 to use in the next steps.
| FABRIC | NO. OF 7.75″X WOF STRIPS TO CUT | 7.75″ SQUARES NEEDED |
|---|---|---|
| Fabric 1 | 7 Strips | 33 |
| Fabric 2 | 2 Strips | 9 |
| Fabric 3 | 1 Strip | 5 |
| Fabric 4 | 2 Strips | 6 |
| Fabric 5 | 1 Strip | 5 |
| Fabric 6 | 1 Strip | 5 |
| Fabric 7 | 1 Strip | 5 |
| Fabric 8 | 2 Strips | 6 |
| Fabric 9 | 1 Strip | 3 |
| Fabric 10 | 1 Strip | 5 |
Cut pieces for Diamond in a Square units
Set aside leftover pieces of Fabrics 1 and 2 to use in the next step.
UPDATE 1/12/19: We updated the dimensions for the Fabric 1 & 2 squares for the center block. The original dimensions (2 – 4″ squares of Fabric 1 and 1 – 4.75″ square of Fabric 2) will still create the correct size block, but there is not a lot of wiggle room between the points of the diamond and the seam allowance.
| FABRIC 1 | QTY NEEDED |
|---|---|
| 4.75″x 4.75″ Squares | 2 |
| 2.75″x 2.75″ Squares | 16 |
| FABRIC 2 | QTY NEEDED |
|---|---|
| 4″x 4″ Squares | 1 |
| 2.5″x 2.5″ Squares | 8 |
Cut rectangular pieces
Gather leftovers of Fabrics 1, 2, & 9 from the previous steps.
Cut (12) 3.5″x 42″ strips of Fabric 1.
Subcut C-H pieces shown in the tables below.
| FABRIC 1 PIECES | DIMENSIONS | QTY NEEDED |
|---|---|---|
| C-Piece | 2″x 3.5″ | 8 |
| D-Piece | 3.5″x 3.5″ | 24 |
| E-Piece | 5″x 3.5″ | 8 |
| F-Piece | 6.5″x 3.5″ | 46 |
| G-Piece | 9.5″x 3.5″ | 4 |
| H-Piece | 12.5″x 3.5″ | 2 |
| FABRIC 2 PIECES | DIMENSIONS | QTY NEEDED |
|---|---|---|
| D-Piece | 3.5″x 3.5″ | 4 |
| FABRIC 9 PIECES | DIMENSIONS | QTY NEEDED |
|---|---|---|
| D-Piece | 3.5″x 3.5″ | 4 |
Part 2: Assembly
Assemble 6.5″ Diamond in a Square unit
- Cut the (2) 4.75″ squares of Fabric 1 along the diagonal. Make a crease to mark the mid-point on the longest side of all 4 triangles.
- Fold the 4″ square of Fabric 2 in half twice to create a crease marking the mid-point along each edge.
- Align the long edge of one Fabric 1 triangle to one side of the Fabric 2 square and sew together. Repeat with the next Fabric 1 triangle on the opposite side of the square. Press open and trim dog ears.
- Attach the 3rd and 4th Fabric 1 triangles to the remaining sides of the Fabric 2 square. Press open and trim to 6.5″x 6.5″.
Assemble 3.5″ Diamond in a Square units
- Cut the (16) 2.75″ squares of Fabric 1 along the diagonal. Make a crease to mark the mid-point on the longest side of all 32 triangles.
- Fold the 2.5″ square of Fabric 2 in half twice to create a crease marking the mid-point along each edge.
- Align the long edge of one Fabric 1 triangle to one side of a Fabric 2 square and sew together. Repeat with the next Fabric 1 triangle on the opposite side of the square. Press open and trim dog ears.
- Attach the 3rd and 4th Fabric 1 triangles to the remaining sides of the Fabric 2 square. Press open and trim to 3.5″x 3.5″.
- Repeat with the remaining Fabric 2 Squares and Fabric 1 Triangles until you have made all (8) 3.5″x 3.5″ Diamond in a Square units.
Attach Row 1 to the 6.5″ Diamond in a Square unit

- Attach (2) F-pieces to opposite sides of the 6.5″ Diamond in a Square unit.
- Attach the (2) H-pieces to top and bottom.
February Instructions
Have you seen the gorgeous palettes being shared on Instagram with #begoniaquilt? Visions of spring are coming early this year! If you haven’t started yet, it’s not too late to join in on the fun.
Grab whatever you need to get in the zone and find your Triangle Groove – This month we begin making our HSTs.
Most of the HST fabric combos for Begonia are in increments of 8, making it a great opportunity to use the 8-at-a-Time HST assembly method. Or as I like to abbrev it: 8aaT. However, four of the combos are not in an increment of 8, yielding a total of (16) extra HSTs. When this happens, go ahead and set those extra pieces aside for another project or to piece into your quilt back.
This month we only need (4) of the Fabric 1+8 HSTs. Even though we will be using more Fabric 1+8 HSTs in coming months, they are all in increments of 8 so you will still end up with 4 extra at the end.
Below is a quick little tutorial covering the basic steps for making HSTs 8aaT. If you need a little more help, there are countless online tutorials for this method – Share your favorites with everyone in the comments below!
8-at-a-Time Half-Square Triangles

Step 1: Pair 7.75″ Squares for the fabric combos needed. On the wrong side of the top square, draw a diagonal line from corner to corner in both directions.
Step 2: Sew a scant* 1/4″ seam on both sides of both diagonal lines.
Step 3: Cut the squares in half horizontally and vertically.
Step 4: Then cut the squares along the marked diagonal lines.
Step 5: Press seams open, or to the side of the darker fabric.
Step 6: Trim to 3.5″x 3.5″.
*A scant 1/4″ seam is when you sew slightly inside the 1/4″ line. I like to do this when I’m going to be trimming my pieces to size because it gives a little extra wiggle room.
If you want even more wiggle room for trimming, you could sew 3/16″ or 1/8″ seams. As long as your HSTs end up 3.5″x 3.5″, it won’t matter what size your seams are.
February’s Instructions

March Instructions
Ding ding, time for round three! This month we are going to kick our HST production to the next gear and start prepping our stockpile for the longer rows ahead.
Refer to last month’s instructions for HST assembly steps.

April Instructions

May Instructions
Happy Spring! Here are the instructions for our May rows.
Just a lil reminder: If you’re following along with the HST assembly schedule, we’re front-loading the HSTs to keep the total workload even(ish) for each month. This month we are assembling HSTs for Row 8 (August). The HSTs we’re using in Row 5 were part of March’s instructions.

June Instructions
This month we’re prepping HST Units for Row 9 and attaching Row 6. If you’re excited to knock out the last bit of HST construction early, you can peep the units for next month (Row 10) back in the January post.
For those printing out the instructions—I’ve separated this month’s diagrams into 2 images so you can print the construction and assembly diagrams without printing the whole attachment diagram.
UPDATE: JUNE 6TH ☜(꒡⌓꒡)
Instructions to make the HSTs for Row 6 (April) were incomplete.
To complete Row 6, you will need to make 8 – [2\7] HST Units this month.


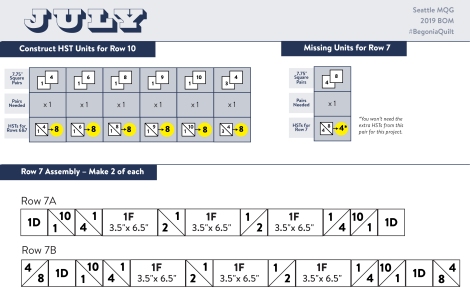
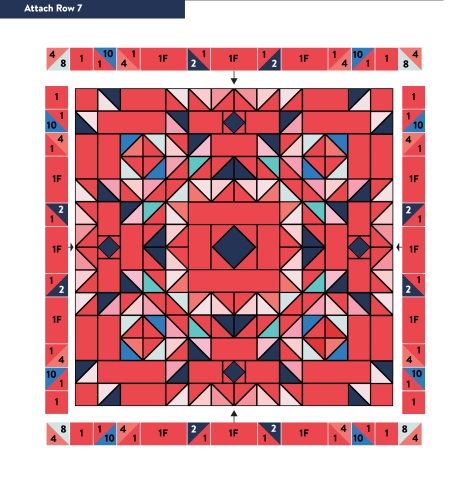
July Instructions
If you’ve been playing along with the HST schedule – Congratulations, we’ve made it to the last of the HST assembly!
We found out last month that April’s HST prep was missing a couple of pairs. For this month’s row assembly, you’ll probably notice that we’re short a set of [4/8] HSTs. I’ve put the Missing Units for Row 7 in their own box on the construction graphic below.
August Instructions
The days are getting shorter, but our rows are getting longer!
After this month, we have just 2 more rows – Sept. & Oct. We will be adding a border in November and talking about finishing our quilts in December.


September Instructions
Happy September everyone!!


October Instructions
October is a bittersweet month for our Begonia garden—the mystery is resolved as we add the last row of HSTs and get the first glimpses of our Begonias in full bloom. Thank you to all that took the jump together last January, all that have joined in along the way, and all that shared words of kindness and support ❤️❤️❤️All y’all rule!
Next month I’ll be posting measurements for different border sizes to make it easy on anyone that wants to expand the quilt to a bed size. In December we’ll do a roundup of our favorite finishing tutorials. Start thinking about if you have any favorites or ‘go-to’ tutorials – there’ll be a link to submit them in next month’s post.


November Instructions
When it comes to borders, the possibilities are endless! This post is only going to talk about basic (non-pieced) borders, but you should add whatever kind of border makes your heart happy
Basic Border Steps – Finished Size: 72″x 72″
- Cut (8) – 3.5” x WOF strips
- Sew ends of 2 strips together to make 1 long strip of fabric.
- Repeat with remaining strips to create (4) border strips.
- Attach first 2 strips to opposite sides.
- Press seams to the outside and trim.
- Attach 2 remaining strips to unbordered sides and press.
Here is a simple graphic showing the dimensions for borders to make 3 different finished sizes: Throw, Twin, and Bed. To make one of the larger sizes follow the steps above, using 12.5″x WOF strips where needed.

If you’d like more information on attaching borders, I have gathered 3 different resources:
- Amy Smart’s Adding Borders 101 is a concise blog post on how to calculate precise border dimensions by measuring your quilt top.
- If you prefer video tutorials, Applying the Perfect Borders to Your Quilt: Avoiding Waves and Puckers from The Quilter’s Planner covers similar information with a bit more explanation and more visuals.
- For in-depth border instruction, Martingale has a downloadable PDF from Robin Strobel, How to Sew Borders on Quilts, that will walk you through the process.